Windows Active Directory Home Lab simulating an Enterprise environment
Introduction
· What is Active Directory?
A Windows domain is a group of users and computers under the administration of a business or organization. The main purpose of a domain is to centralize the administration of common components of a Windows computer network in a single repository called Active Directory (AD). The server that runs the Active Directory services is known as a Domain Controller (DC).
The core of every Windows Domain is the Active Directory Domain Service (ADDS) which acts as a catalogue that holds all the information about the objects in your network. Objects may include users, groups, machines, printers, shares, and many others.
· What are its uses?
The main advantages of having a configured Windows domain are:
i. Centralized Identity Management: All users across the network can be configured from Active Directory with minimum effort. This allows users to access the network resources from any machine within it since the user identification details e.g. username and password are authenticated by the Active Directory. This means that the user credentials are available throughout the network as opposed to the credentials existing in each machine individually.
ii. Managing security policies: You can configure security policies directly from Active Directory and apply them to users and computers across the network as needed e.g. restrict all normal users from accessing the control panel of the organization’s machines.
· Objective of the lab: What are we trying to achieve by doing this lab?
The end goal for this lab is to create an enterprise environment with 1,000 user profiles managed by Active Directory. Its main purpose is to help us better understand active directory, how it works and Windows networking in general. This lab will form the basis for future tasks to simulate real-world scenarios.
· Target Audience
The target audience for the lab is mainly individuals with knowledge of basic networking protocols, looking to get into Cybersecurity e.g. SOC Analysts or IT Desk Support Roles. Key to these roles is understanding Active Directory and being able to appropriately configure it as required by the organization you work for.
High-Level Architectural Overview
The diagram below shows the overview of the lab we are setting up.

a) Domain Controller (DC)
The Domain Controller (DC) virtual machine has the host OS Windows Server 2019 installed and running. It has two Network Interface Cards (NICs):
i. The first one, NIC (Internet), connects to the Internet. This external network automatically gets an IP address from the Home Router via DHCP (Dynamic Host Configuration Protocol)
ii. The second one, NIC (Internal Network), connects the private internal network connecting the clients. Here, we assign IP addresses for the internal network.
After setting up IP addressing, we set up Active Directory and then created our Domain i.e. mydomain.com.
Then we configure NAT; Network Address Translation, so the clients in the internal network can reach the internet via the domain controller.
Finally, we configure DHCP for the DC such that when we create the Windows 10 client, it can get an IP address for the internal IP address space.
After setup, we will then run a PowerShell script to add 1,000 users to our domain such that the Windows 10 client can use any of the generated credentials to access the private network and subsequently access the internet through the DC.
b) Windows 10 Client
This client virtual machine, named Client1, runs on Windows 10 OS. This VM is connected to the internal private network, and we use it for testing purposes i.e. We will use one of the 1,000 generated domain accounts to log into it. This will in turn prove our Active Directory concept of taking your authenticated login credential and successfully logging into any machine in the domain network.
Installation & Setup
· System requirements
- 64-bit Windows 10 Operating System.
- Minimum 1.4GHz Intel Pentium or equivalent (2GHz recommended) processor.
- At least 2GB of RAM.
- At least 1.5GB of disk storage.
· Prerequisite Downloads:
These are the necessary building blocks we need for the lab. Follow the links to download as per the instructions.
· VirtualBox:
- Download VirtualBox via the link (Be sure to pick the correct download for your OS) https://www.virtualbox.org/wiki/Downloads.
- Run and install VirtualBox to your local machine setup (i.e. Follow the steps of the installation guide accepting all the defaults).
· Windows 10:
- Download the latest Windows 10 Installation Media Tool from the link https://www.microsoft.com/en-us/software-download/windows10
- Once downloaded, Run the Media Creation Tool.
- Read and accept the Licensing Agreement.
- Select the ‘Create Installation Media (USB flash drive, DVD, or ISO file) for another PC’ option and click next.
- Use the recommended options for Language, Architecture, and Edition and click next.
- Select ‘ISO File’ as the media to use and click next to download the ISO Image for Windows 10.
· Windes Server 2019:
- Download the Windows Server 2019 disk image from the link https://www.microsoft.com/en-us/evalcenter/download-windows-server-2019
- Make sure you’ve selected the ISO downloads option, English in this case.
Create the Domain Controller Virtual Machine:
· Go to VirtualBox and click on New to create a new Virtual Machine (VM).
· For name, type in ‘Domain Controller’, Type: Microsoft Windows, Version: Other Windows (64-bit). Then click on Next.
· Give the new VM 2GBs of RAM, then proceed to click on next using the defaults until you finally create the Domain Controller VM.
· Click on the domain controller then select ‘Settings’.
· Go to ‘System’, then ‘Processor’ to select the number of CPUs you’d like to utilize for the Domain Controller. In my case, I have 8 CPU cores, so I opted to use 2 for the DC. (Set these per your machine features)
· Next, while still in ‘Settings’, go to ‘Network’ to create the two NICs (Network Interface Cards): One dedicated to the internet that will run NAT (Network Address Translation) and the other that will serve and is dedicated to the internal VM network.
· The first adapter should be “NATed” i.e. connected to your Home internet as shown in the image below. This is the NIC (Internet).

· Add one more adapter that’s going to be for the internal network and click ‘OK’. This is the NIC (Internal Network).

· The VM is now configured but it’s still empty. Click on it, browse to your installed Windows Server 2019 disk image, select mount, and retry boot.
· Ensure you select the Windows Server 2019 Standard Evaluation (Desktop Experience) to have a GUI to interact with as opposed to a command line interface.
· Choose “Custom install” and select the unallocated space for installation.
· Follow the on-screen instructions to complete the installation.
· After completing, it will ask for a password to the default admin account: Password@1 and click Finish.
· To access the server account, you need to click Ctrl-Alt-Del. Go to ‘Input’ on the top pane of your VM window, then select ‘Keyboard’ and finally select ‘Insert Ctrl-Alt-Del’.
· Use your password to log in.
· To gain the full experience of the VM, go to ‘Devices’ on the top pane and select ‘Insert Guest Additions CD Image’.
· Then go to ‘File Explorer’, then ‘This PC’, and open ‘CD Drive (D) VirtualBox Guest Additions’.
· Run the ‘amd64’ version, click on ‘Next’ continuously, then ‘Install’, and finally ‘Reboot Now’.
Configure the Domain Controller
i) Setting up IP addressing.
The NIC (Internet) will have IP addresses set up automatically via the home router and DHCP. However, we do need to manually set up IP addresses for the NIC (Internal network). To do this follow the steps below:
· Click on the ‘Network’ icon on the bottom right of the Taskbar.
· Click on the ‘Network Connected’ button to open the Ethernet Settings page.
· Click on the ‘Change Adapter Options’ button to open the Network Connections page from the Control Panel as shown in the image below.

· Notice we have two network connections. We now have to identify and differentiate the two NICs i.e. the Internal Network and Internet, appropriately name them for easier reference when setting up routing, and then assign an IP address to the internal network NIC.
· Click on the ‘Ethernet’ to open and proceed to click on ‘Details’.
· Check out the Property ‘Autoconfiguration IPv4 Address’ and see its property value. In my case, the IP address of this NIC is 169.254.98.163. This is an APIPA IP address; a self-assigned IP address on a NIC that can’t reach its DHCP server.
· Close the menu and rename Ethernet to _INTERNAL NETWORK_ by right-clicking it and clicking on ‘Rename’.
· We need to assign IP addresses to the Internal Network. So right-click on it and select ‘Properties’.
· Double click on ‘IPv4’ to open.
· Select ‘Use the following IP address’. Referring to the Lab Overview diagram, assign the IP address 10.10.0.1 and subnet mask 255.255.255.0. Here, we don’t assign a default gateway IP because the Domain Controller will act as the default gateway for our setup.
· For the ‘DNS Server addresses’, Active directory automatically installs DNS when it is installed. This means that our server will use itself as the DNS server. To implement this for our lab, we can either use the NIC’s IP address 10.10.0.1 or use the loopback address 127.0.0.1 as the ‘Preferred DNS Server’.

· Click on ‘OK’ to complete the setup.
· Click on ‘Ethernet 2’ to open and proceed to click on ‘Details’.
· Check out the property ‘IPv4 Address’ and see its property value. In my case, the value 10.0.2.15 indicates that this is the NIC connected to the internet.
· Close the menu and rename Ethernet 2 to _INTERNET_ by right-clicking it and clicking on ‘Rename’.
· Close the Network Connections window.
ii) Rename the PC.
· Right-click the start menu and go to ‘System’.
· Click on ‘Rename this PC’.
· Type the name DC and click on next.
· Click on ‘Restart Now’ and ‘Continue’ to affect the name change.
iii) Install Active Directory Domain Services (ADDS).
· On the server manager dashboard, click on ‘Add Roles and Features’.
· Click on Next until you get to the ‘Server Selection’ page where we pick the server that we want to install ADDS. In our case, we only have one server which is the DC. Select it and click on ‘Next’ to open the Server Roles page.
· Select ‘Active Directory Domain Services’. Then click on ‘Add Features’ on the pop-up window. Then click on ‘Next’ on this and the succeeding windows until you get to the ‘Confirmation’ page.
· Click on ‘Install’.
· After the installation is complete, click on ‘Close’ to close the window.
NB: We have successfully installed the software for ADDS but we have not created the actual Domain yet.
iv) Create the Domain.
· On the top pane of our VM, take note of the notifications button with an urgent symbol next to it. Click on it to see the notification regarding Post-Deployment Configuration with a link ‘Promote this server to domain controller’.
· Click on the link to open the Active Directory Domain Services Configuration wizard.
· On the Deployment configuration page, select ‘Add a new forest’ write ‘mydomain.com’ as the Root domain name, and click on Next.
· On the Domain Controller Options page, type in the password Password@1 and click on Next on the preceding pages until you Install.
· The VM will be automatically restarted.
NB: On login, notice the username now becomes MYDOMAIN\Administrator indicating that the Domain was created and the default admin account registered in it by default. In the next step, we now create a dedicated Administrator account for our setup instead of using this default account.
v) Create the dedicated Administrator Account.
· Click on the start menu and open the Windows Administrative Tools dropdown.
· Open the ‘Active Directory Users and Computers’ menu.
· You’ll see the newly created domain mydomain.com. Right-click on it, click on New, and scroll to ‘Organizational Unit (OU)’ to create a new OU to put our Admin account in. Name it ‘ADMINS’.
· Create the admin user by right-clicking on ADMINS, clicking on New, and select ‘User’.
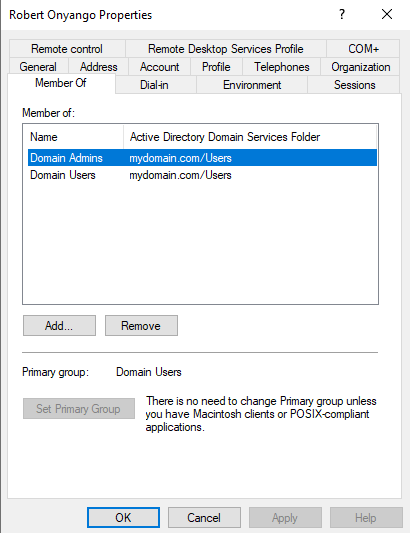
· Input a name e.g. In my case I used myself. Take note of the user logon name. It usually takes the format of last name and first name initial in most organizations e.g. for Robert Onyango, it will be onyangor@mydomain.com. I recommend you follow this practice and use your name.
· Once done, click on Next and input the password ‘Password@1’. Then proceed to Finish.
· To make the created user a domain admin, right-click on it, go to ‘Properties’, then ‘Member of’, then ‘Add’.
· Type in domain admin, then click ‘Check Names’. It will resolve to ‘Domain Admins’. Click ‘ok’.
· To use it, sign out of the session as MYDOMAIN\Administrator. On the Windows sign-in screen, Click on ‘Other User’.
· Input the new admins email address e.g. onyangor@mydomain.com and the password ‘Password@1’.
· You will log in as the new Administrator, Robert Onyango.

vi) Install and configure RAT and NAT on the Domain Controller.
NAT — Network Address Translation is a technology that allows devices on private networks to access the internet without legitimate public IP addresses of their own but rather uses the IP address of the border device e.g. Routers. In our lab, we would like to access the internet with our Windows 10 Client1 VM, which has a private IP address to access the internet through the Domain Controller.
· Click on ‘Add Roles and Features’, next till you get to the server selection page. The DC should be automatically selected.
· Click on Next and the Server Roles page, and select ‘Remote Access’. Click on Next until you get to the Role Services page.
· Select ‘Routing’ and click Add Features on the window that pops up.
· Click on Next continuously until you ‘Install’.
· Once the installation is complete, close the window. Click on ‘Tools’, then ‘Routing and Remote Access’.
· Right-click on ‘DC (Local)’ and select ‘Configure and Enable Routing and Remote Access’.
· Click on next and select ‘NAT’. Click on next and the window below should appear with our two NICs.

· Select the ‘-INTERNET-‘ interface and select next. Then ‘Finish’.
vii) Configure DHCP on the Domain Controller.
DHCP is a protocol that allocates IP addresses on the devices in a network. We need it in our lab to ensure that the Windows 10 client we intend to connect to the private network gets a valid IP address in the range 10.10.0.100–200 and thereafter connects to the internet with the aid of NAT.
· Click on ‘Add Roles and Features’, next till you get to the server selection page. The DC.mydomain.com should be automatically selected.
· Click on Next and on the Server Roles page, select ‘DHCP Server’. click Add Features on the window that pops up.
· Click on Next continuously until you ‘Install’.
· Close the window once the installation is completed.
· Go to ‘Tools’ and select ‘DHCP’ to set up the scope (IP address range).
· On the left most pane, click the dropdown dc.mydomain.com, right click on IPv4 and select ‘New Scope’.
· Click next on the installation wizard. For the scope name, use the IP address range for easier reference i.e. 10.10.0.100–200, and click next.
· Set the IP address range as follows and click Next.

· Click on Next accepting the defaults including the option to configure DHCP options now.
· Since the clients are going to use the Internal Network NIC as their default gateway, add 10.10.0.1 as the Router (Default Gateway) IP address.
· Click on Next accepting the defaults (be sure to confirm the DNS IP address matches the network diagram IP), until you ‘Finish’.
· Right-click on dc.mydomain.com and click ‘Authorize’. Then right-click on it again and click ‘Refresh’ to activate your configurations.
Add Users using the PowerShell script
We’re now going to use a PowerShell script to add sample users to the lab to simulate a real-world environment with over 1,000 users. The script automates the series of steps above where we added the dedicated user Robert Onyango above. This should serve as an intuitive guide as you go through the script.
The script and accompanying details on it are stored in my GitHub repository.
On download, you can save the script on the DC desktop for easier access. You can your name at the top of the list of names for realism and testing purposes.
Take note that it is not advisable to enable internet access for domain controllers in production environments. However, since this is a lab environment and we need to access and download the PowerShell script to complete the objectives, we can make the exception. To enable internet access via the domain controller, follow the steps below:
· Open ‘Configure this local Server’ on the DC.
· Click on ‘on’ which is on the ‘IE Enhanced Security Configuration’ to open.
· Turn off the two options that are by default set to ‘on’.
NB: Take note type the command ‘Set-ExecutionPolicy Unrestricted’ in the PowerShell command line to successfully run the script. Read the documentation on the GitHub repo for more information.
After successfully running the script, you can confirm the users were indeed added via the Active Directory Users and Computers module.


Create Windows 10 Client Virtual Machine.
· Go to VirtualBox and click on New to create a new Virtual Machine (VM).
· For name, type in ‘Client1’, Type: Microsoft Windows, Version: Other Windows (64-bit). Then click on Next.
· Give the new VM 2GBs of RAM, then proceed to click on next using the defaults until you finally create the Domain Controller VM.
· Click on the domain controller then select ‘Settings’.
· Go to ‘Network’ and set adapter 1 to be in ‘Internal Network’. In line with our lab objectives, this computer should use the DC as its DHCP server.

· The VM is now configured but it’s still empty. Click on it, browse to your installed Windows 10 disk image select mount, and retry boot.
· Click on next and select ‘Install Now’.
· Select ‘I don’t have a product key’.
· Select ‘Windows 10 Pro’ and click on Next. NB: You can’t join a Windows Domain using Windows 10 Home.
· Accept the licensing agreements.
· Select ‘Custom: Install Windows Only (advanced)’ and accept the default disk allocated space to complete the download and installation. The VM will restart a few times. Do not interfere in any way with the process.
· Select the default region ‘United States’ and US keyboard format.
· Select ‘I don’t have internet’ then ‘Continue with a limited setup’.
· For the account name of who is going to use the PC, type in user. We won’t input a password at this stage.
· Accept the privacy settings for the device. This will complete the Windows installation in a few minutes.
Client-DC Operations & Testing
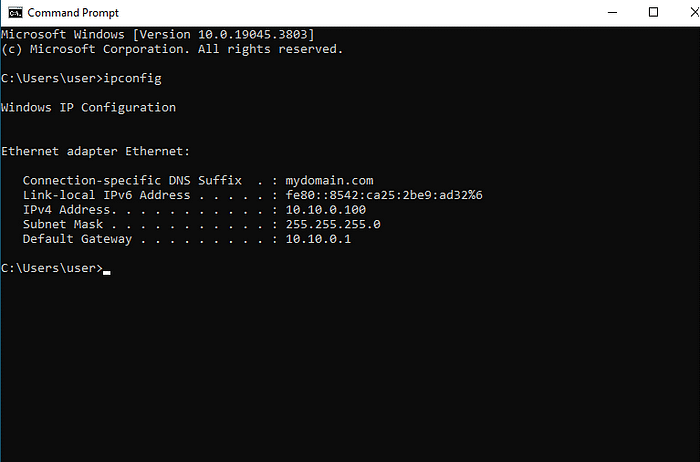
i) With your DC VM running, run ‘ipconfig’ command on your Windows Client command prompt to test if the host has a Default Gateway which in this case will be the IP address of the Domain Controller. Also, note that the Client gets an IP address from the DHCP range we specified for the DC i.e. 10.10.0.100. This confirms that the infrastructure works as expected.
ii) Next, we can test whether we can access the internet. Ping google.com using the Windows client command prompt. The successful result below shows that NAT is correctly configured and works as expected in the Domain Controller (DC) such that with our private IP, we can still access the internet.

iii) Join the domain with the Windows 10 VM as Client1:
· Right-click Start Menu and go to ‘System’.
· Scroll down to ‘Rename this PC (Advanced)’ and click on it.
· Click on ‘’Change’.
· For Computer Name use Client1 and Domain mydomain.com, and click ‘ok’. This step will change the name and join the Windows domain at the same time.
· For the pop-up, use the domain admin account credentials that were created when configuring the DC.
· Click on ok on the pop-up that welcomes Client1 to mydomain.com domain. Then restart the VM to apply the changes.
· In the domain controller, under the DHCP options, you should see the Client1 VM as the only client with an IP address leased. (You can refresh the domain if it doesn’t appear immediately).

iv) To confirm that Client1 VM was added under computers in our DC automatically, check the Active Directory Users and Computers, under Computers. This allows you to use any of the 1,000 users we added via the PowerShell script to use the Windows 10 Client VM to log in to the domain. You can test this with any of the usernames.

Resources
· Active Directory Introduction, see Andy Malone’s YouTube video on Learn Microsoft Active Directory (ADDS) in 30mins
· TryHackMe Room: Active Directory Basics
· To learn how to properly configure the DC and add the 1,000 users, watch Josh Madakor’s video: How to Setup a Basic Home Lab Running Active Directory (Oracle VirtualBox) | Add Users w/PowerShell
