Building Azure Virtual Network Infrastructure for Small Businesses: Filtering Web Traffic with NSG Rules by Network Segments

Introduction
In this lab, we will learn how to configure and use a Network Security Group (NSG) to filter inbound and outbound network traffic to and from Azure resources in an Azure virtual network.
What are NSGs? Network Security Groups are a way to limit network traffic to resources in your virtual network. Network security groups contain a list of security rules that allow or deny inbound or outbound network traffic to your cloud resources. A NSG works quite similarly to a firewall as well as its security rules which again are similar to firewall rules.
You can assign a network security group to a subnet or a network interface, and define security rules in the group to control network traffic. A network security group can be associated multiple times to numerous subnets or NICs (Network Interface Cards).
NSG security rules have the following properties that have to be defined:
- Name: A unique name within the security group.
- Priority: A number between 100 and 4096 that defines how rules are processed. The lower-numbered rules are processed before the higher-numbered ones. Once traffic matches a rule, it stops, therefore the preceding rules aren’t processed on the ingress or egress traffic.
- Port (Any, source, destination): Most protocols have specific pre-defined ports used to communicate hence this must be accounted for when configuring NSG rules.
- Protocol: Any, Transmission Control Protocol (TCP), User Datagram Protocol (UDP), Internet Control Message Protocol (ICMP), HyperText Transfer Protocol (HTTP), HTTPS, File Transfer Protocol (FTP) etc.
- Source: Any, Individual IP address, classless inter-domain routing (CIDR) block, service tag or application security group.
- Destination: Any, Individual IP address, classless inter-domain routing (CIDR) block, service tag or application security group
- Action (Allow or Deny): Allow or deny traffic through to or from the devices the NSG is applied to.
Lab Architecture
The following the lab architecture diagram:

The lab is going to be composed of the following:
- Two virtual machines, vm-1 (web server) and vm-2 (management server) hosting servers.
- The virtual machines are going to be grouped into two application security groups, asg-web and asg-mgmt. Application security groups (ASGs) enable you to configure network security as a natural extension of an application’s structure, allowing you to group virtual machines e.g. by function as in our case, and define network security policies based on those groups. A key benefit of using ASGs is that they allow you to reuse your security policies at scale by reducing the complexity of handling explicit IP addresses and multiple rule sets.
- A network security group nsg-1 that limits network traffic our resources vm-1 and vm-2. This is where we will define our access rules for each of the virtual machines as per the image below using ports much like we would do in a Layer 4 Firewall.
- All the resources will belong the same virtual network vnet-1 because network security group rules using application security groups may only be applied when the ASGs are associated with network interfaces on the same virtual network.
The purpose of the lab to demonstrate how we can configure NSG rules to allow a user:
- Access to our webserver via port 80, HTTP.
- Deny access to our webserver management pane via port 3389, RDP.
- Allow access to our management server VM via port 3389, RDP.
- Deny web access to our management server via port 80.
NOTE: To complete this lab, you will need an Azure subscription in which you have administrative access.
Summary of tasks
- Create a network security group and security rules.
- Create application security groups.
- Create a virtual network and associate a network security group to a subnet.
- Deploy virtual machines and associate their network interfaces to the application security groups.
- Test traffic filters.
Create an azure resource group, virtual network and a subnet.
- Start a browser session and sign-in to the with the link above.
- In the search box at the top of the portal, type Virtual networks. Select Virtual networks in the search results.
- On the Virtual networks page, select + Create.
- On the Basics tab of Create virtual network, enter or select the following information:


5. Click on the IP Addresses tab highlighted as above.
6. In the address space box in Subnets, select the default subnet.

7. In Edit subnet, enter or select the following information:

8. Select Save.
9. Select Review + create at the bottom of the screen, and when validation passes, select Create.
10. Once created, you can click on Go to Resource where you will see the virtual network deployed as follows:

Create application security groups to enable you to group together servers with similar functions
- In the search box at the top of the portal, enter Application security group. Select Application security groups in the search results.
- Select Create.
- On the Basics tab of Create an application security group, enter or select this information:

4. Select Review + create.

5. Select Create.
6. Repeat the previous steps, specifying the following values to create the management ASG:

7. Select Review + create.

8. Select Create.
Create a network security group to secure network traffic in your virtual network
- In the search box at the top of the portal, enter Network security group. Select Network security groups in the search results.
- Select + Create.
- On the Basics tab of Create network security group, enter or select this information:

4. Select Review + create.

5. Select Create.
6. After a successful deployment, click on Go to resource, to proceed with the next steps.
Associate network security group to subnet
- Ensure you are in the overview page of nsg-1.

2. Select Subnets from the Settings section of nsg-1 as highligted above.
3. In the Subnets page, select + Associate:
4. Under Associate subnet, select vnet-1 (az-rg-1) for Virtual network.
5. Select subnet-1 for Subnet, and then select OK.

Take note that we can add multiple subnets to associate with this network security group as explained above on this window. This greatly reduces the administrative work when dealing with the security of many subnets in your organization as we will see below.
Create security rules for the network security group with the subnet of the virtual network you created above
- Select Inbound security rules from the Settings section of nsg-1.
- In Inbound security rules page, select + Add:
- Create a security rule that allows ports 80 and 443 to the asg-web application security group. In Add inbound security rule page, enter or select this information:

The rule would typically look like this:

4. Select Add.
5. Complete previous steps with the following information:

The rule would typically look like this:

6. Select Add.
7. The nsg-1 inbound rule set should now look like this:

Take note of the following (referencing the above diagram):
- Azure defines three default inbound security rules for your network security group. These rules deny all inbound traffic except traffic from your virtual network and Azure load balancers.
Create two virtual machines (VMs) in the virtual network you created earlier
- In the portal, search for and select Virtual machines.
- In Virtual machines, select + Create, then Azure virtual machine.
- In Create a virtual machine, enter or select this information in the Basics tab:

4. Select Next: Disks then Next: Networking.
5. In the Networking tab, enter pr select the following information:

6. Select the Review + create tab.
7. Select Create. The VM may take a few minutes to deploy.
8. Create the second virtual machine
- Repeat the previous steps to create a second virtual machine named vm-2.
- Wait for the VMs to complete deployment before advancing to the next section.
Associate network interfaces to an application security group
NOTE: When you created the VMs, Azure created a network interface for each VM, and attached it to the VM. Add the network interface of each VM to one of the application security groups you created previously.
- In the search box at the top of the portal, enter Virtual machine. Select Virtual machines in the search results. You should see the two created virtual machines as below:

2. Select vm-1
3. Select Networking from the section of vm-1

4. Select the Application security groups tab, then select Configure the application security groups
5. From the Configure the Application Security Groups template, select asg-web from the Application Security Groups drop-down menu, and then click the Add button at the bottom of the template page.
6. Repeat previous steps for vm-2, selecting asg-mgmt in the Application security groups pull-down menu.

Test the NSG connections
Azure provides an efficient way to test our connectivity to our virtual machines. Follow the steps below to ascertain that our configurations work as intended:
- In vm-1, select Connect under the Connect menu.

2. Under the Troubleshoot dropdown, select Test network security groups.

3. Set the following testing conditions:

4. The select Run Test. We are going to test whether our VM can be accessed by HTTP traffic.
5. You will get the following results. HTTP access to our web server is allowed.

6. Run the same test for HTTPS, 443. You should get the results below.

7. Run the same test for RDP, 3389. You should get the results below.
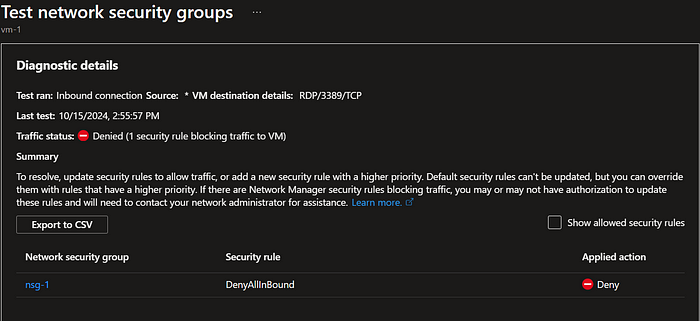
Conclusion
Test and see whether the results match for the second virtual machine vm-2. The tests will bring consistent results i.e. RDP connections will be allowed while all other connection ports will be denied as detailed in the Network Security Group.
Proceed to clean up the subscription by deleting the resource group Storage-RG.
