Building and Hardening an Azure Honeypot: A Journey with Microsoft Sentinel and Live Internet Threats (Part 4)

Microsoft Sentinel Incident Response (NIST SP 800–61 Phases Two, Three, and Four)
Introduction
Welcome back to the blog series, ‘Building and Hardening an Azure Honeypot: A Journey with Microsoft Sentinel and Live Internet Threats’. Click the link to part three of the lab where we deployed the SOC for our environment. We then proceeded leave the environment live for 24 hours. In this section, we are going to detect and analyze the results from our Azure Sentinel following the NIST SP 800–61 guidelines phase two. We will then proceed to remediate the vulnerabilities uncovered based on the investigations carried out in phase two. Finally, we will conclude the lab with phase four of the NIST SP 800–61 recommendations, specifically for our resources.
Detection and Analysis (NIST SP 800–61)
This second phase of NIST SP 800–61 involves accurately detecting and assessing the validity and severity of possible incidents. We will rely on indicators from our Microsoft Sentinel SIEM where we have added analytic rules to assist in monitoring our environment logs.
For further understanding of the complete process of SOC analysts, we will analyze an incident. We’ll determine whether it is indeed a threat to our infrastructure our infrastructure i.e. true positive, the vulnerabilities being targeted for exploitation and the severity of the incident. As a result of this analysis, we will decide how to escalate the incident to the next phase.
The honeypot has been running for the last 24 hours. Let’s examine the data using KQL from the Log Analytics Workspace.

We get the above metrics by running the following KQL queries:
- How many Security Event logs were created in the Windows Server VM?

- How many authentication logs were created in our Linux Server VM?

- How many security incidents occurred based on the evaluation of the Sentinel Analytics rules?

- How much external traffic was allowed through our L4 firewalls i.e. the NSGs?

Next, we should take a look at our maps to see where in the world the attacks were propagated from. The dataset is relatively comprehensive hence it’s large size however, I cannot guarantee 100% placement accuracy of the attacker IP addresses. We can see the interesting patterns below:
Windows RDP Logon attempts

Linux Logon attempts

Inbound traffic through our NSGs

Logon attempts to the SQL Server Database

Now, we’ll proceed to see an example of analyzing an incident, determining its severity and validity then follow the best recommended steps to close.
Navigate to the incidents page in Microsoft Sentinel. In my case below, you can see I have 50 open incidents. Note the discrepancy without Security Incident data query that shows we have 144 incidents. This occurred because the analytics rules are set to aggregate multiple, related alerts into a single alert.

Looking at the data, all the incidents spun up are Brute Force attacks with medium severity. Luckily, it doesn’t seem that anyone gained access to any of our systems. However, all our endpoints were discovered on the public internet and there were attempts to exploit these vulnerabilities.
We can take the first incident for demonstration purposes. Click on View full details.

In this incident’s page you can see many other of its details like the: Attackers’ IP and the various information about the IP, Incident’s Timeline, The alerts in the incident, and the actions we can take.
Example of IP Address Geolocation details
Click on View full details to see more information about the attacker.

Here we can see the timestamps of when they triggered the Security Alerts.

Exit this Window and Click on Investigate. Here, you can see in the map that the Attacker IP addresses were involved in other multiple brute force attacks.
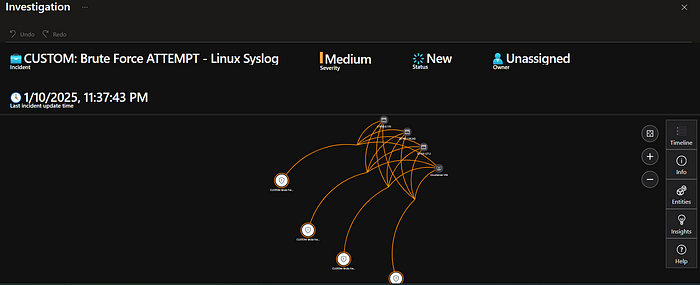
Take note that in a real-world SOC, an analyst would be assigned this incident using the highlighted menu below. He would then be required to analyze it, for example how we’ve attempted above, then proceed to remediate the vulnerability. A key final step is to change the incident status from New/Active to Closed once the issue is resolved. This is basically what is done in phase three of NIST SP 800–61.

An assumption I could make is that this data is in line with current trends of hacking cloud hosted infrastructure, gaining access and taking control of VMs through brute forcing credentials to setup a C&C (Command and Control). The hackers would then proceed to use these machines to mine cryptocurrency, a very computationally expensive affair, all at the expense of the organization owning the tenant.
Containment, Eradication and Recovery
This is the third phase of the NIST SP 800–61. It involves responding to incidents in our infrastructure ensuring the damage is reduced by removing any damage causing components, putting in place preventative and protective measures against future incidents of a similar type and restoring the systems to the required function levels.
The easiest and perhaps best way we could contain the exposure of our virtual machine servers is to deallocate them. However, this is not practical is a live production environment where downtime could be very costly. Therefore, we should work towards protecting our endpoints by limiting access to them, especially for our lab scenario where everyone can find and attempt to exploit our endpoints.
We will assume that we have assigned the SOC analysts the incidents as highlighted above who have proceeded to take the following actions to improve our security posture:
1. Lock down the NSGs associated with our servers to limit public exposure.
2. Turn on the firewall on the local Windows Machine following Windows recommended security practice.
3. Add an NSG for our subnet for additional network protection i.e. Simulating the common architecture of internal and external firewalls.
4. Add private endpoints to our Key Vault and Blob Storage Account to only allow authorized access to our sensitive data.
Hardening the NSGs
- Navigate to the WindowsServer-VM, under Networking, click on Network Settings. Delete the DANGER_AllowAllInbound rule.

2. Then click on Create port rule. Then select Inbound port rule.
3. Input the following parameters. Then click on Add.

4. The above rule ensures that only your IP address can access the WindowsServer-VM. Repeat the same process for the LinuxServer-VM NSG. This security measure will reduce the exposure of this endpoint to only allow one IP address to access and proceed to exploit.
Turn on the Windows Defender Firewall
1. RDP into your WindowsServer_VM. Type wf.msc to open the Windows Defender Firewall menu.
2. Turn on the Domain, Private and Public profiles on the local firewall.

Deploy subnet NSG
The intricacies of this hardening step can be found in my article Building Azure Virtual Network Infrastructure for Small Businesses: Filtering Web Traffic with NSG Rules by Network Segments. The NSGs we have in the lab are configured at the Network interface level of each of the two servers. Now, we want to add an extra layer of protection by adding an NSG to the subnet vnet1.
What this would mean for inbound traffic in our deployment is that only the traffic that is allowed in by thus subnet NSG will be processed by each network interface NSG, thus adding an extra layer of protection and further hardening our infrastructure.
Proceed with the following steps:
- Navigate to Network Security Groups in Azure portal and create a new NSG. You can name it Subnet-NSG.

2. Configure the same rules as we did for the virtual machines NSGs.
3. Next, navigate to Virtual Networks where you’ll find the vnet-1 where the servers are located. Click on it.
4. Under Settings, click on Subnets. Click on subnet-1.
5. Scroll down to Security and under Network Security Group, set it as Subnet-NSG. Click on Save.

With this, we have successfully added an NSG to our subnet.
Add Private Endpoints to Azure PaaS Resources
This step will ensure that only the VMs within our private network will have access to these resources. Proceed with the following steps:
1. Navigate to our Key Vault honeypot-kv.
2. Under Settings, click on Networking. On the Firewalls and virtual networks tab, select the option Disable public access. Then allow the Exception that appears below. Click on Apply.

3. Then click on the Private endpoint connections tab. Click on Create. Ensure that the resource group, region, and virtual network match your honeypot resources. Select the resource type and Microsoft.KeyVault/vaults. The private endpoint should appear as below:

4. Navigate to your geoip20241129 storage account. Disable public network access. Click on Save.

5. Create a Private Endpoint just as we did for the Key Vault. The only difference is select blob as the resource.

We are done with Phase Three of the NIST SP 800–61 documentation. Now we wait for another 24 hours to see how our honeypot is impacted by the hardening we’ve done. It’s currently 11th January 2025, 4:40PM.
Post-Activity Phase: Data comparisons and Lesson learnt
This is the fourth phase of NIST SP 800–61 standard guidelines. It involves reviewing the activities the SOC team did in response to the security incident up to its resolution and the lessons learnt during this security incident. The main aim is to use the experience to improve the organizations security posture and processes in responding to security incident.
The honeypot has been running for 24 hours. Let’s review the data from the Log Analytics to see if the network hardening we did have made a difference to our security posture.

We get the above metrics by running the following KQL queries:
- How many Security Event logs were created in the Windows Server VM?

- How many authentication logs were created in our Linux Server VM?

- How many security incidents occurred based on the evaluation of the Sentinel Analytics rules?

- How much external traffic was allowed through our L4 firewalls i.e. the NSGs?

Looking at the broad data above, we can see a significant decrease of the values from our queries. Take note that the AzureNetworkAnalytics_CL query and SecurityIncident queries give improved results of zero. This shows that the NSG hardening worked as required in the first case and none of the analytics rules fired for the SecuirtyInicident query to pick.
The Event and Syslog queries does have some results that might seem significant at first glance but upon further investigation, you realize that most these logs are from computer and system accounts. While investigating, had we found user accounts logs, that would be red flag as this would indicate a malicious actor is in trying to exploit our systems.
Lessons Learnt
Our findings highlight important security policies that should always be implemented for future deployment:
· Ensure your NSGs and Firewalls are configured proactively to be secure right from the start.
· Reduce your infrastructure attack surface by implementing techniques such as: having a layered system design in terms of an outer and inner firewall, ensuring the endpoints that need to be private are indeed private.
· Having clear IAM strategies, policies and procedures ensuring that user activity can be tracked in case it is malicious, and ensuring that policies such as multi-factor authentication and use of strong passwords can easily be enforced for all accounts.
· Always have continuous monitoring with near-real-time threat detection and automated incident response capabilities.
Finally, as we conclude our lab, ensure that you’ve cleaned up your deployment. Delete the honeypot-RG and the new users in Microsoft Entra.
Resources
- What is a Security Operations Centre (SOC)?
2. SIEM Tutorial for Beginners | Azure Sentinel Tutorial MAP with LIVE CYBER ATTACKS!
3. Josh Madakor’s GitHub Repo Research:
4. AZ-900 Azure course on Coursera.
5. TryHackMe Pathway: SOC Level 1.
6. NIST SP 800–53 Rev. 5 Security and Privacy Controls for Information Systems and Organizations regulatory standard
7. NIST SP 800–61 Rev. 2 Computer Security Incident Handling Guide
8. Gained insights on Azure Sentinel Analytics rules from Colton Hick’s article:
9. Gained insights on Windows penetration simulation and detection:
